A Project Manager can delegate the planning of a work package to a Project Team Member by assigning an owner to the work package. The owner of a work package can:
•Plan the work package in time: add and plan products and activities. See below.
•Plan resources and skills on products and activities. See below.
•Create log items on products and activities. See Working with logs.
•Add dependencies to products and activities. See Working with dependencies on plan-items.
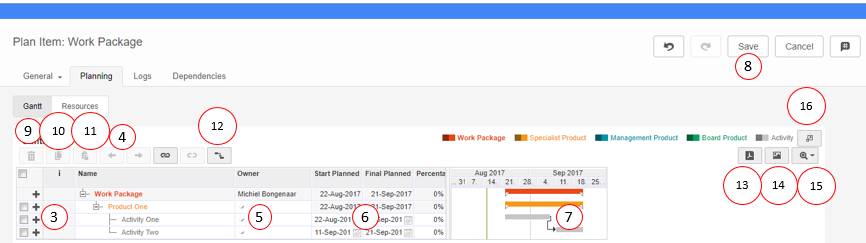
Edit the work package planning, sub-tab Gantt
Plan the work package (in the time)
Step 1. Navigate to the work package via your Home Page or by clicking the work package in the project Gantt,a pop-up appears.
Step 2. Navigate to the tab Planning, sub-tab Gantt, and click ![]() .
.
Step 3. To add plan-items to the Gantt, click ![]() , a new plan-item is inserted in the Gantt. Enter a name for the new plan-item.
, a new plan-item is inserted in the Gantt. Enter a name for the new plan-item.
Note: depending on which ![]() you clicked you create a specialist product or an activity.
you clicked you create a specialist product or an activity.
Step 4. To change the indentation of a plan-item, select the plan-item row and click one of the arrows: ![]() .
.
Step 5. Optionally enter an owner for a plan-item. An owner of a plan-item will see the plan-item on his Home Page, and is able to edit information of that plan-item (but not the planning!). See Working with plan-items.
Step 6. There are different ways you can enter a time planning in the columns Start planned and Final planned:
•Click in a cell in one of the columns and directly enter dates.
•Click on ![]() in one of the cells and use the calendar to enter dates.
in one of the cells and use the calendar to enter dates.
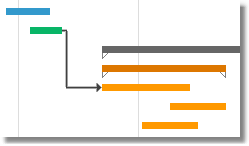
•Click-and-drag a bar directly in the Gantt chart.
Step 7. There are different ways you can enter dependencies to your planning:
•Click-and-drag from one bar to another bar.
•Select two plan-item rows and click ![]() . Select multiple rows by using Ctrl+click, Shift+click or by flagging them.
. Select multiple rows by using Ctrl+click, Shift+click or by flagging them.
Note: to change a dependency right-click the dependency line in the Gantt chart, or navigate to the plan-item page, tab Dependencies.
Note: to remove a dependency select the two plan-item rows and click ![]() .
.
Note: dependencies to other projects can be entered on the tab Dependencies. See Working with dependencies on plan-items.
Step 8. When the planning is finished, click Save
Below the other buttons in the work package Gantt are explained.
| 9. | Remove selected plan-item rows (select multiple rows by using Ctrl+click, Shift+click or by flagging them). |
| 10. | Copy selected plan-item rows. |
| 11. | Paste selected plan-item rows. |
| 12. | Resolve conflicts that result from dependencies. |
| 13. | Print the Gantt as a PDF file.The PDF will look like the Gantt as it is displayed on screen. |
| 14. | Create an image of the Gantt. The image will look like the Gantt as it is displayed on screen. |
| 15. | Adjust the scale of the Gantt: zoom in/out, zoom fit. |
Note: you can also adjust the scale of the Gantt by left-/right-clicking the date header of the Gantt chart.
| 16. | Click |
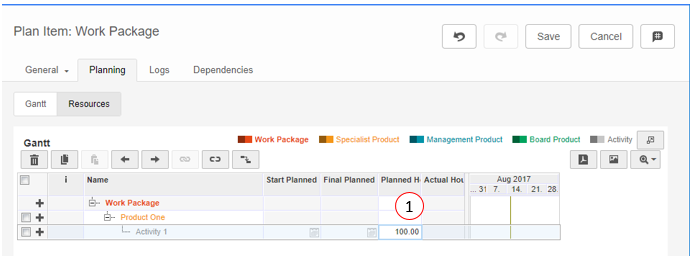
Edit the work package planning, sub-tab Resources
Plan resources or skills on the work package
Step 1. Navigate to the work package via your Home Page or by clicking the work package in the project Gantt,a pop-up appears.
Step 2. Navigate to the tab Planning, sub-tab Resources, and click ![]() .
.
Step 3. In a plan-item row, double click the field in the column Planned Hours, a dialogue box appears.
Step 4. Click Add Resource or Add Skill, in the pop-up select the desired resources or skills, and click Add. The resources and skills can now be planned.
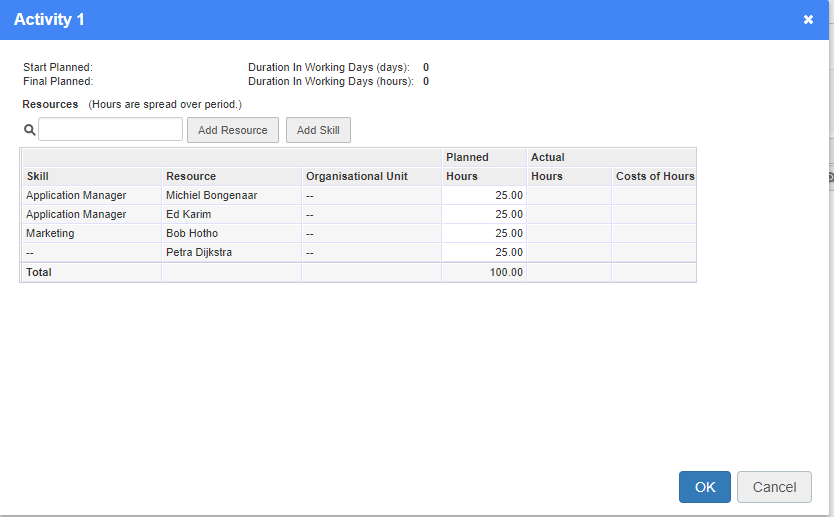
Dialogue plan Resources and Skills
Step 5. In a row, click on the field in the Planned Hours column and enter the amounts.
Step 6. When your finished, click OK