The lay out editor allows you to configure certain pages within Fortes Change Cloud to your needs. The lay-out editor can be found on the following locations:
In the Project model:
- detail pages of plan-items (stages, work packages, products and activities),
- detail pages of log items (risks, issues, quality reviews, changes, actions, lessons learned),
- property pages of the project
In the Portfolio model:
- Portfolio items
In the report model (found in the Portfolio model)
- properties section of the model can be configured using the lay out editor
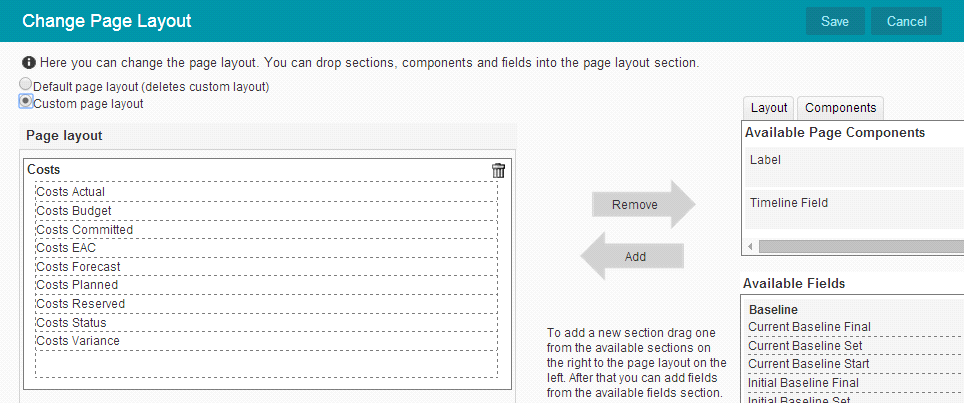
Below, an example of the lay out editor found in the Properties page of Project model:
1.Go to the project model, click on the tab Properties, the detail page appears.
2.Click Layout, click Edit layout, chose custom page layout.

The lay out editor
3.Use drag-and-drop to edit the layout and content (fields) of the page (drag from right to left)
4.Always start with an Page section. This element can be found under the tab Lay out in the right section of the screen
5.Once the page section is placed on the left side, fields can be dragged in right-to-left
6.Drag entire page section with fields included to the left by dragging and dropping sections taken from Available fields. (in the example above: Baseline)
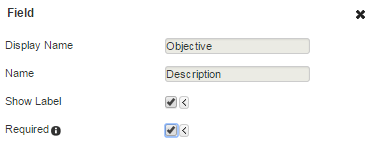
7.To make a field mandatory, double click the field, a pop-up appears, select ticket box Required

The detail page of a field. Check the box after 'Required' to make it mandatory
![]()
Mandatory fields can be recognised by the *
8.You can change background colour of page sections.
9.Click Save. Use this often to check the results of the changes you made in the Properties screen.
Note 1: If a page contains required fields, an user can only save the page when all required fields are filled in. Required fields are shown by * after field name.
Note 2: Use colour codes #b8e1e5 ![]() and #0194a6
and #0194a6 ![]() for Fortes corporate colours.
for Fortes corporate colours.