You can allocate resources on projects. Be aware that availability of your resources should be up to date. Also project managers should first request hours on skills and/or resources.
The subtab Request & Allocation (Projects) and the subtab Request & Allocation (Resources) show the same information, but structured differently:
•The subtab Request & Allocation (Projects) lists all requests per project
•The subtab Request & Allocation (Resources) lists all requests per resource
Subtab Request & Allocation (Projects)
Allocate resources to projects
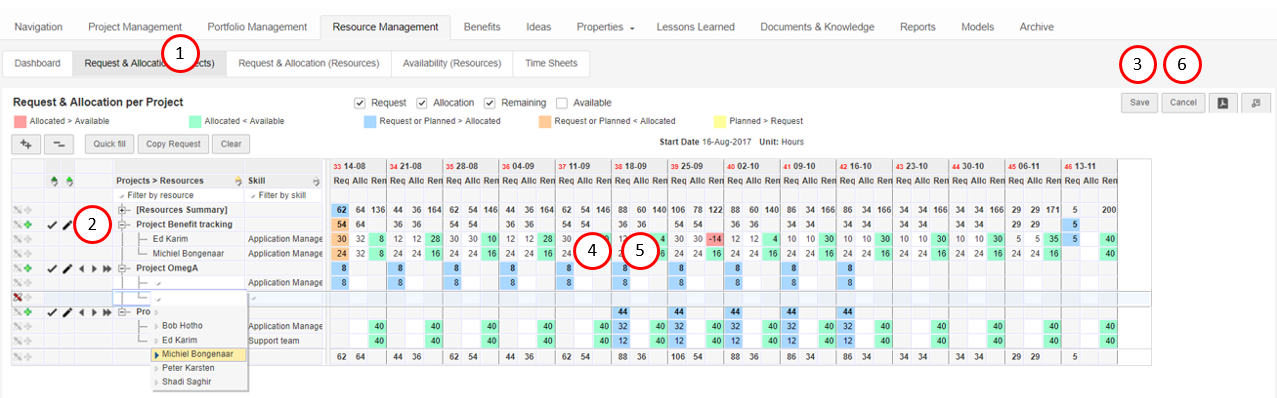
Step 1. Navigate to the tab Resource & Allocation (Projects). The grid shows an overview of planned/requested/allocated/remaining hours per project per resource per period.
Step 2. Click the ![]() icon in front of a project to unfold the resource details per project, or click
icon in front of a project to unfold the resource details per project, or click ![]() in the top left corner to unfold all rows.
in the top left corner to unfold all rows.
Step 3. Click ![]() to switch to edit mode, in order to enter and manage allocation of hours.
to switch to edit mode, in order to enter and manage allocation of hours.
Step 4. In the edit mode you can allocate hours per period per resource in the columns Allocation (Allo):
•you can use the select boxes above the grid to hide or show columns in the grid
•you can enter hours in individual cells
•you can use click-and-drag to select a range of fields; use shift-click-and-drag to select multiple ranges; on selections you can:
oQuick fill all fields in the selection with the same value: press q, or click the button Quick fill, or right-click the selection and select Quick Fill
oQuick fill all fields in the selection with the same value as the 'requested hours': press r, or click the button Copy Request, or right-click the selection and select Copy Request.
oQuick fill all fields in the selection with the same value as the 'planned hours': press p, or click the button Copy Planned, or right-click the selection and select Copy Planned.
Note: this option is available depending on your configuration.
oClear all entries in all fields in the selection: press x, or click the button Clear, or right-click the selection and select Clear.
Note: Click Help, then Shortcuts for an overview of shortcuts.
oMove all allocated hours one or four weeks to the left or right: use the icons ![]() in front of the rows.
in front of the rows.
oCheck the legend above the grid to understand them meaning of the colour highlights.
Step 5. Some notes on working with (the colour indications in) the grid:
•Red coloured cells indicate overallocation of a resource. Unfold the top row [Resources Summary] to check the availability of other resources. To allocate another resource to solve the overallocation, click the ![]() icon in front of the project, a new row appears: select the appropriate resource and allocate hours.
icon in front of the project, a new row appears: select the appropriate resource and allocate hours.
•Blue coloured cells indicate underallocation on a project. This generally concerns requests that are not allocated yet.
•Orange coloured cells indicate overallocation on a project.
•Green coloured cells indicate remaining availability of a resource.
•Use the filter at the top of the project or skill column to quickly change from an overall view to e.g. a resource specific view.
Step 6. After finishing the allocation, click Save.
Use the message service to contact a project manager
Step 1. The grid contains a message service to support a dialogue between project manager and resource manager. To start a dialogue with the project manager of a project click the ![]() icon in front of the project name, a pop-up appears.
icon in front of the project name, a pop-up appears.
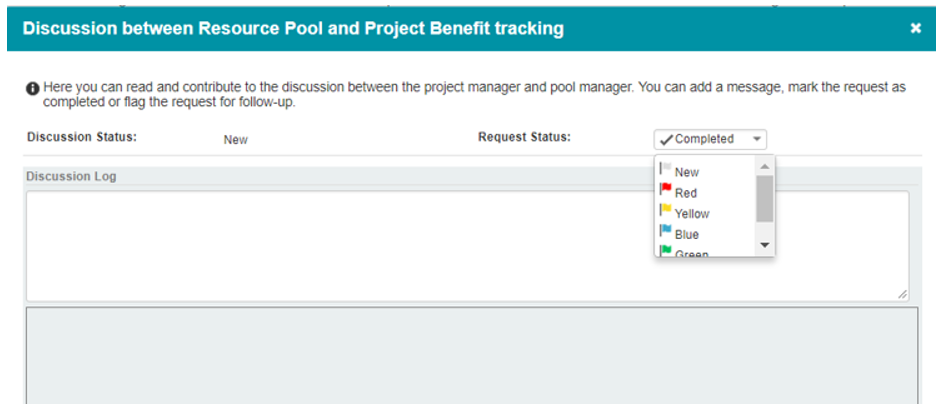
Pop-up message service
Step 2. In the pop-up you can start a dialogue by entering a message. Optionally flag the discussion; this flag is shown in front of the project name. Click OK to send the message.
Legend of the icons used by the message service:
•![]() new discussion
new discussion
•![]() urgency level (flags in the colours Red, Yellow, Blue and Green)
urgency level (flags in the colours Red, Yellow, Blue and Green)
•![]() completed
completed
•![]() start a discussion
start a discussion
•![]() message sent to the project manager
message sent to the project manager
•![]() message received from the project manager
message received from the project manager